Practical Technomancy
IMG_7592.jpeg

Blog

Thinking out loud

Rough Animation Tests - Skid-stop

So now it's down to pixel animation basics. How, in this format, do you animate a classic "skid-stop"?

It appears to be about timing.

This is my surprised face.

In the above, my intent was to show the sprite skidding to a halt, flattening out as a result of that, and the tail flying past the sprite, stretching out to the right a bit, and then snapping back, like the ears on a cartoon dog flapping forwards when it skids to a halt.

The sprite skids to a halt, but then keeps going a bit. I need to make the halt more abrupt. The timing of the tail's expansion and inversion don't match up.

In the second video below, it's better. But still room for improvement.

The good: speeding up the braking helped.

The less good: need to work on the timing of the tail collapsing and following through.

It's too languorous, and the motion doesn't look linked to the bright lead sprite's sudden stop. The impression is not of mass moving with inertia, but a mechanical emanation.

The stop itself could be sped up a bit further, it's still a little slow.

Screen Shot 2018-04-24 at 11.15.11 PM.png

The point where the tail starts going off to the right needs to be right as the bright sprite compresses and stops. Right there around row 14 or 15.

And the trailing lights need to shrink as soon as the brakes are hit and the sprite starts decelerating. So right there around 11 or 12.

You really have to go at this via trial and error, draw something that looks right, test it, and analyze where exactly it isn't meeting your vision. Writing about it here helps.

Animation Planning

So the plan is, create at least one intro (in this case "braking") animation, and one "acceleration" animation, each of which will have to also return an integer for how many pixels per frame the sprite is moving at the end, so that it can hand off easily to the standard "travel" code.

When the sprite reaches its designated target pixel in travel mode, it switches from "travel" to "scanner" mode. It then needs to run the intro animation, and then hand over to the loop animation, which will start and end on the same pixels as the intro and outro animations, to make life easier.

The loop animation will run a certain number of times (right now, we use a random number between two constant values defined at the top of the sketch), and then exit and hands over to the outro animation.

The outro animation will (again) start on the same pixel as loop animations end on, so will accelerate the sprite away, ending on a target pixel for hand-off to "travel" mode.

That's the rough plan, anyhow. We will see how it goes.
Progress: Excel to Arduino script

I had some momentary downtime today, and used it to throw together a Powershell script for Witch Lights programming.

The script takes parameters for the location of the excel file, and the name of the animation to generate, processes the excel file, and outputs Arduino code that can be dropped into the Witch Lights code to create new animations.

For example, this excel file:

excelinput.png

Produces this code:

arduinooutput.png

This makes me super happy, because now that I can preview animations in excel, this closes the loop to take those animation designs and output them more-or-less directly to the Witch Lights test rig. And then I can test the animations on my cats.

Next up: finish the test rig.

Complaints and improvements

My only complaint about this powershell script is that it is, well, powershell. I work on linux and a Mac at home, and would prefer not to have to remote in to a Windows computer to run this script, push the output to GitHub, then pull the changes down on my computer at home.

I wrote it in powershell because that's the language I'm learning for work, where I administer Windows computers for my sins. It was a worthwhile exercise in data processing in a powerful (if ugly) language.

Ideally, I would want to write this in python. I have never touched python. Yet. So I could use some help with that, if any intrepid and helpful people are interested in contributing to this project. Hit me up and let me know if that's the case.

Please?

Edit Tuesday; April 24, 2018, 7:53 PM: A generous reader heard my plea, and wrote a python script that converts csv files to animation code! People are awesome sometimes.

And now really I need to finish the test rig.

Years of ResEdit have prepared me for this moment

The Witch Lights run on an Arduino Due, which has a lot of RAM (for an Arduino), but has to be programmed using C++. It does so using an object-oriented SpriteManager system written by my good friend James Cronen, which ran successfully for as long as the batteries did without crashes or memory leaks at Firefly 2017. Which was mainly what we were aiming for: reliability and flexibility, leaving future options for improvement.

The code is available on GitHub. And for Arduino FastLED code, it is not difficult to animate, because we had the RAM to play with and create arrays of pixel values, stepped through in sequence, against an array of hex color values, ranging from 1 at the darkest to 8 at the brightest.

The code is pretty readable, it looks like:

    //                    12345678901234567890123
        strcpy(afc_w8v1, "          123456788    ");
        strcat(afc_w8v1, "           12345688    ");
        strcat(afc_w8v1, "            12348876   ");
        strcat(afc_w8v1, "             128876 4  ");
        strcat(afc_w8v1, "              88765  2 ");
        strcat(afc_w8v1, "             887654   1");
        strcat(afc_w8v1, "            8876543    ");
        strcat(afc_w8v1, "           88765432    ");
        strcat(afc_w8v1, "          887654321    ");
        strcat(afc_w8v1, "         887654321     ");
        strcat(afc_w8v1, "        887654321      ");
        strcat(afc_w8v1, "       887654321       ");
        strcat(afc_w8v1, "      887654321        ");
        strcat(afc_w8v1, "     887654321         ");
        strcat(afc_w8v1, "    887654321          ");
        strcat(afc_w8v1, "    88654321           ");
        strcat(afc_w8v1, "   67884321            ");
        strcat(afc_w8v1, "  4 678821             ");
        strcat(afc_w8v1, " 2  56788              ");
        strcat(afc_w8v1, "1   456788             ");
        strcat(afc_w8v1, "    3456788            ");
        strcat(afc_w8v1, "    23456788           ");
        strcat(afc_w8v1, "    123456788          ");
        strcat(afc_w8v1, "     123456788         ");
        strcat(afc_w8v1, "      123456788        ");
        strcat(afc_w8v1, "       123456788       ");
        strcat(afc_w8v1, "        123456788      ");
        strcat(afc_w8v1, "         123456788     ");

OK, so not bad. But what if we could visualize this a bit more easily?

How about something like this:

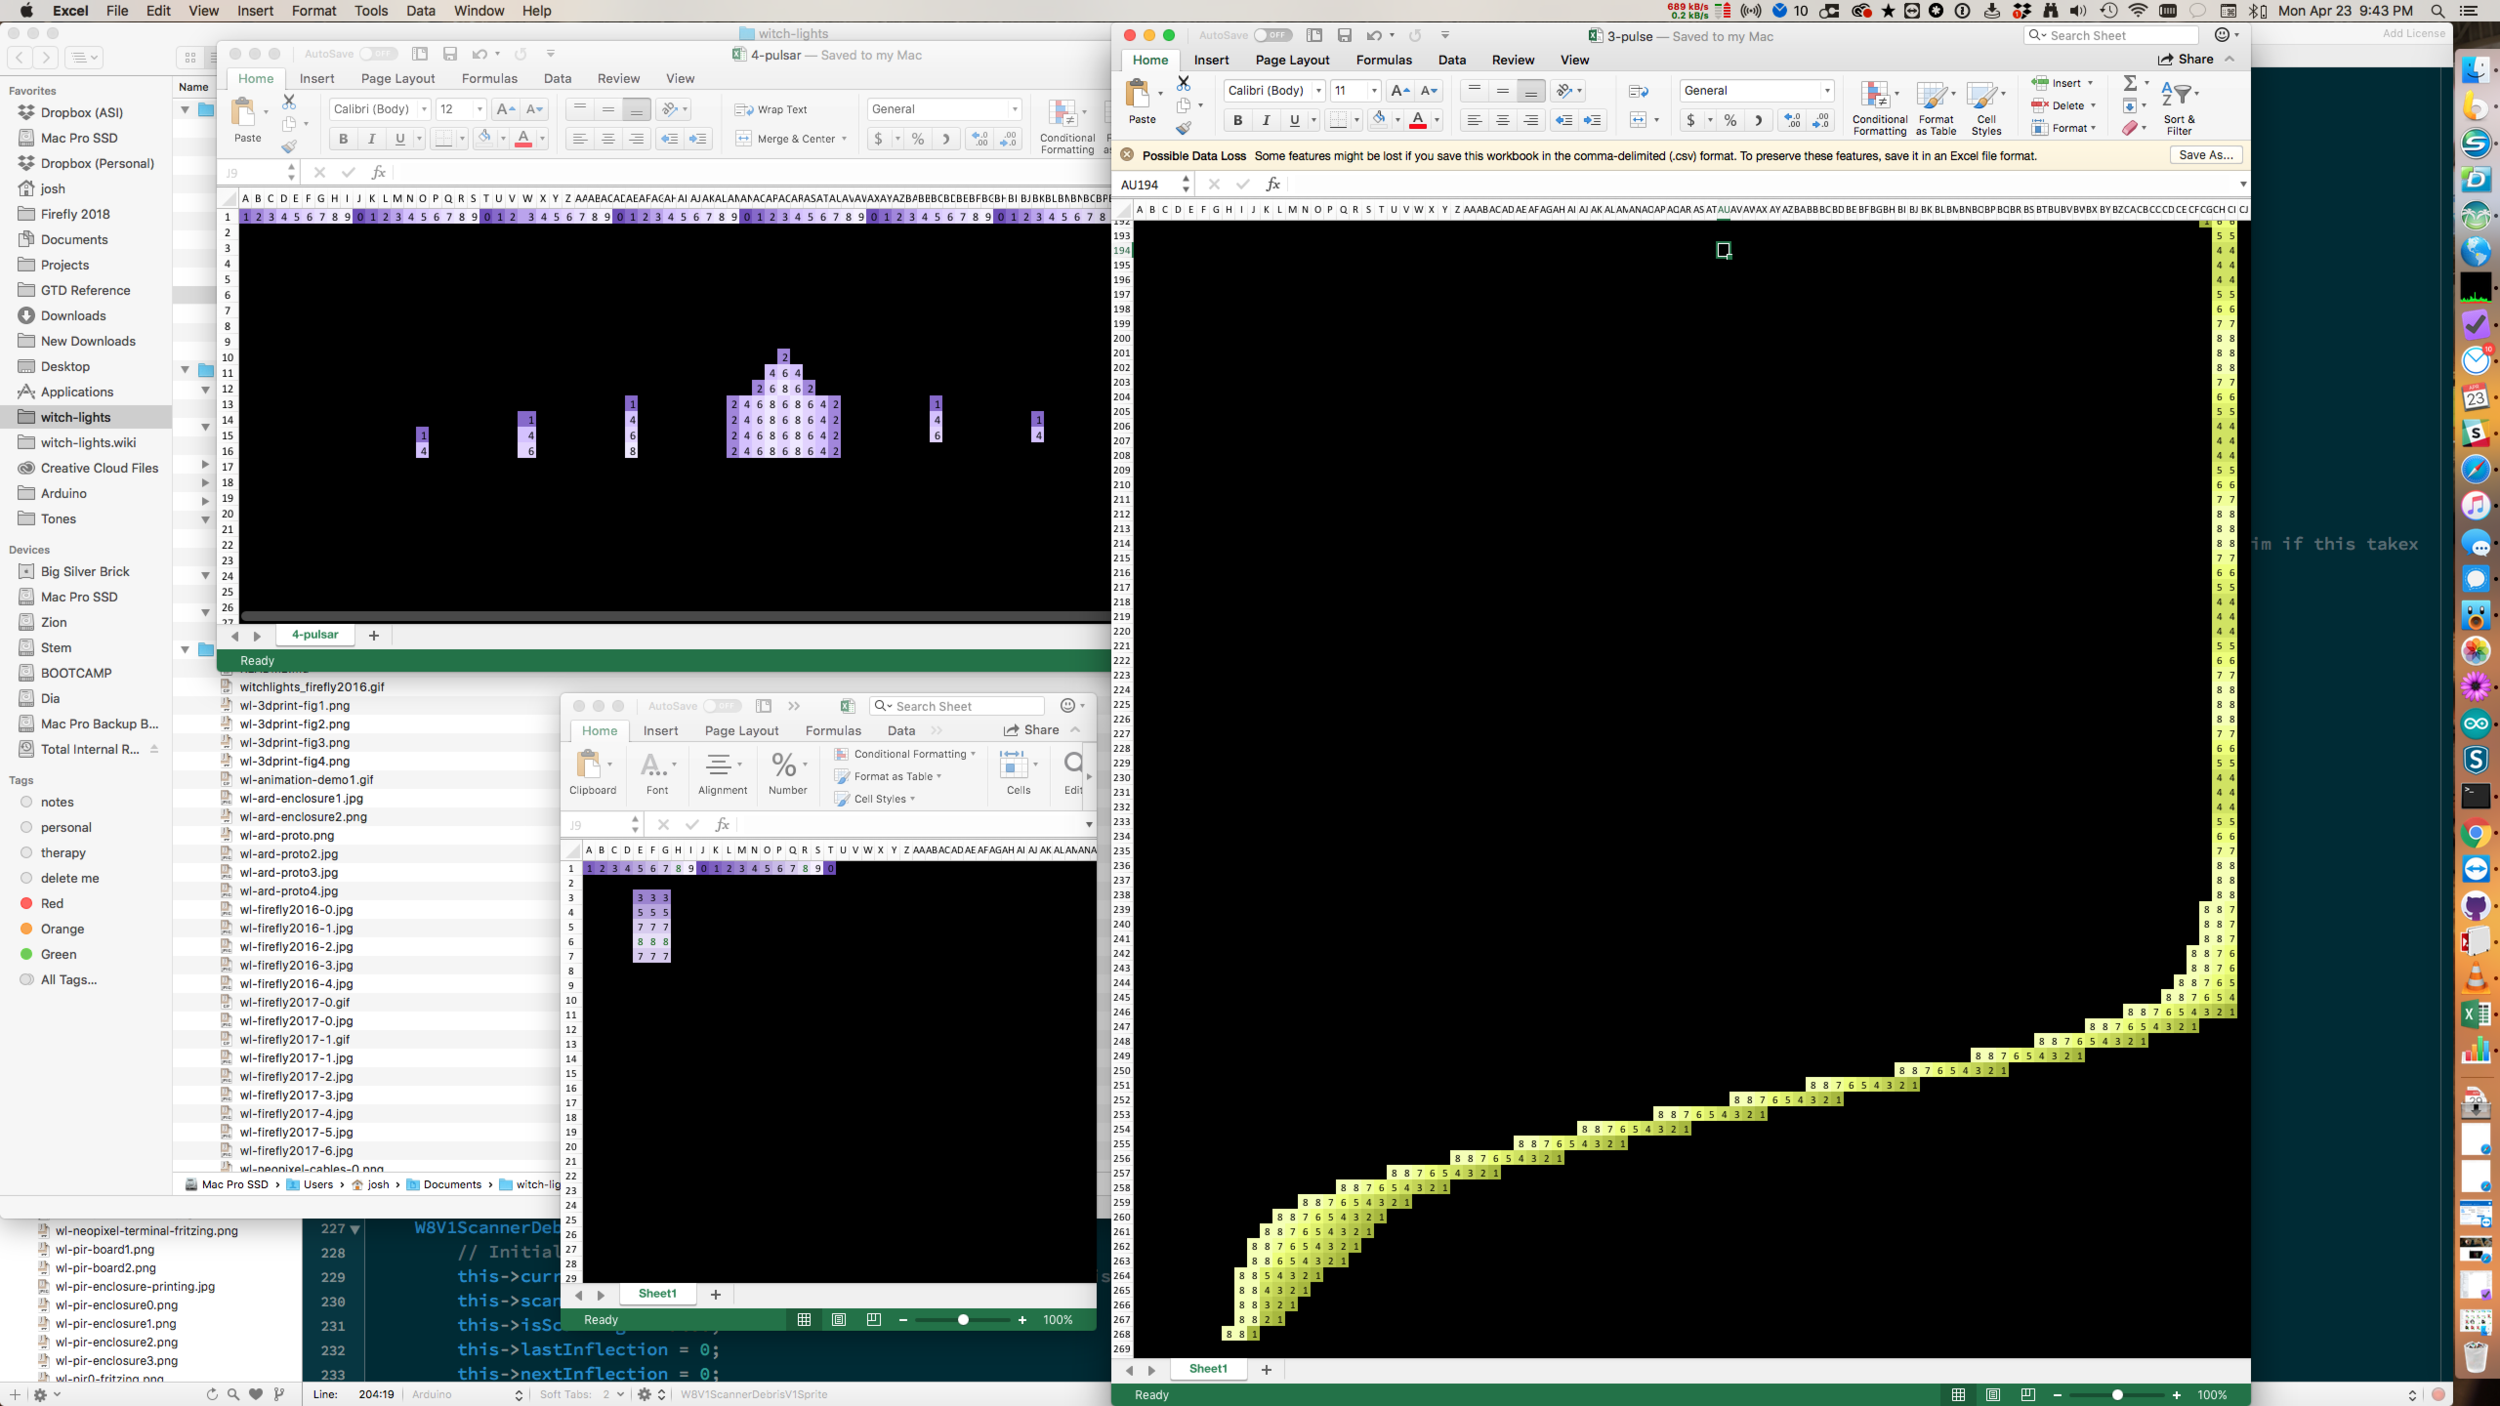
Programming the Witch Lights using conditional formatting in Excel

The horizontal axis is a segment of the pixel array for the Witch Lights, and the vertical axis is time.

Designing in One Dimension

The Witch Lights are a one-dimensional pixel grid, with large bright pixels spaced reasonably far apart. Animation along that grid is a matter of monochrome pixel art using math. I never knew that my days of wasting time in ResEdit in high school would pay off so much later in life.

I design the patterns in two dimensions, and then, to visualize them, I zoom way in, and resize the window to be just one cell high.

And then I use the down-arrow key on my keyboard to scroll through time, making the lights animate.

It's a nice way to preview the animation. Sometimes, what you think should work while drawing pixel by pixel, just doesn't translate.

Setting this up in Excel

The process of bending Excel's conditional formatting to your will is as follows:

Select All your worksheet and under Highlight Cell Rules, select Between…

Screen Shot 2018-04-23 at 10.07.55 PM.png

Then, under Style, select 3-Color Scale.

Screen Shot 2018-04-23 at 10.08.11 PM.png

Select colors for minimum, midpoint, and maximum values. You might want to make the minimum color darker than I have it here. I'm still tuning it myself.

Screen Shot 2018-04-23 at 10.08.37 PM.png

Almost done! Once you hit OK, go back to the same menu and select More Rules…

Screen Shot 2018-04-23 at 10.24.13 PM.png

Select Blanks under Format only cells that contain.

Image 2018-04-23 at 10.29.51 PM.png

Then select the Format pop-up and select Custom Format.

Image 2018-04-23 at 10.30.04 PM.png

Under Background color, select black. Then hit OK to close out the dialog.

And that's it!

Now, if you enter a value from 1 to 8 in any of the cells, it will light up from dark to light depending on value.

Testing on NeoPixels

In order to test this, I have to write a script to process the grid of the spreadsheet and output animation code that can be pasted into the appropriate section of the Arduino code.

That's still in progress. Python would be an ideal language to use, and it's been nearly a decade since I've written anything in ruby.

However, for work, I am learning Powershell. So for my first run through, I'm going to write it in that, as an exercise in the language. Then I'll look at python, which I have meant to learn soon anyways.

So that's what I got. It's late, and I'm going to bed.

Shout out to any other ResEdit nerds out there.